Thursday, July 28, 2016
Tuesday, July 26, 2016
Early turn Soviet Phases: Battle at the Sea of Azov Part 1
This scenario starts off with the Soviets going first in their half turn. All weather is dry and attack supply is not needed. I will try to remember all the other rules as I come to them. Soviet Motorized phase is first allowing Soviet motorized units to move (those with a red box around the movement value) and some non motorized units can move as well is ordered by a Soviet HQ (see Kiev to Rostov rulebook 22.0)


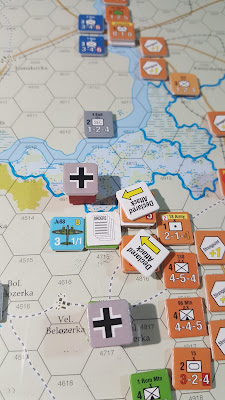


Soviets launch a devastating mandatory attack on Balki to open the game. They must make 4 mandatory attacks this scenario as part of win condition. The question now is does the nearby 191st German Assault gun battalion move to reinforce in the Reaction Phase?


Axis player issues a No Retreat order to the Romanian 4th Mountain. Another Soviet attack is declared on the road to Melitopol. Meanwhile in reaction movement the German 22nd Motorcycle moves north on the dry road.
Air support is revealed. The Luftwaffe attempts to help at Balki and they send interceptors down south to shoot down the Soviet bomber.


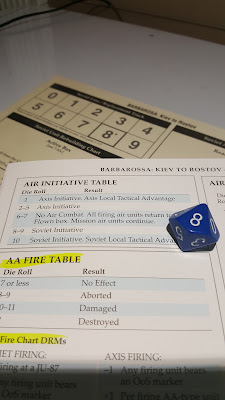
Air combat is now resolved. The Soviet player declares the bomber as the mission unit and the German player declares the BF 109F as the firing unit. The BF 109F is in mission range (kiev to rostov rule 17.22). The Axis player fires at the Soviet bomber. The bomber will not be firing back as he is a mission unit. The Axis player rolls a 9 (on the 3+ column) ... one of the worst results and the Soviet bomber group has evaded Luftwaffe air coverage. Now for anti aircraft fire. There are no AA modifiers and the German player rolls a 1. No effect (7 or more needed). The Soviet flyers are lucky today. The bomber will add 1 strength point to the ground attack.

Up north the German JU 88 does not have to worry about Soviet air cover, survives the flak ground fire and he will contribute 1 strength point to the Romanian defense of Balki. The stage is set for combat resolution. More later


Monday, July 25, 2016
What I've been up to: East Front Series by GMT Games
It is no secret that I am a slight GMT Games fanboy. After dabbling in OCS by MMP Games I decided I wanted to also learn the East Front system by Vance von Borries.
Awards & Honors (First Edition)
I was at first a little scared of the series and taken aback by its complicated movement rules. But like anything else I decided to dive in and I have actually....almost...learned it. Sure each game in the series introduces its own rules like an OCS game but they are not as thick. While OCS covers almost EVERY battlefield the East Front series is very limited. Maybe that is what I like about it. It really gives the feeling of struggling against the weather and command structures. The game is heavily reliant on weather effects. Air combat is done nicely and feels like it serves a purpose but is not as deep as OCS with its refits and airbases. Combined arms attacks are included as well as Soviet HQ's and everything from armored trains to air dropped supplies. Army Group North game in particular has a bunch of well done maps and tutorials. If you can get your hands on a copy grab it.
I also like the supply rules a lot better. You can only use what you have and until you spend it you cannot put anymore out.
I have begun a series of tutorials on Instagram as usual and will be playing Battle of the Sea of Azov scenario this week. I kicked off the Instagram tutorials with some movement information. Another great site you can visit is the War Galley site dedicated to East Front:
http://www.wargalley.com/efs/
http://www.wargalley.com/efs/
Wednesday, July 13, 2016
OCS Middle Mini Campaign Setup
Worked primarily on setting up the allies in the Center mini Campaign for MMP's Blitzkrieg Legend. There are a lot of scenarios in the game and this is just one of 3 mini campaigns you can try out.
Germans go up later this week then I will be ready to.
There is a video on my Instagram below
https://www.instagram.com/p/BHyalX5D1gC


Germans go up later this week then I will be ready to.
There is a video on my Instagram below
https://www.instagram.com/p/BHyalX5D1gC


Saturday, July 9, 2016
OCS Basic combat example: Multiman Publishing's Operational series
This post is to demonstrate the very BASICS of OCS combat. OCS is the Operational Combat Series by Multi Man publishing.
You can find more about it here:
http://www.multimanpublishing.com/Products/tabid/58/CategoryID/7/Default.aspx
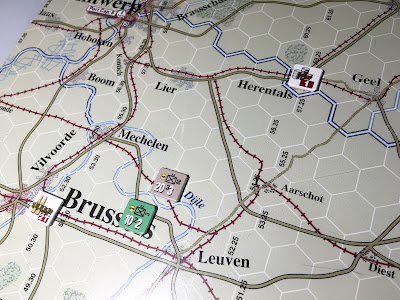
The first thing we see in the image below are the two combat units involved in this attack. Picture if you will it is May 1940 and we have the 86th German Infantry Division attacking across a river trying to force back the 3rd Belgian Infantry Division (grey vs. green).
The first thing you must do is identify the attacker and the defender. There are certain rules for how many times a hex can be attacked and such and you should consult the 4.2 OCS rulebook for more information (Section 9 is combat).
The next thing you must do is put your combat units into supply. This can be thrown to you from an HQ or you can draw supply from a supply dump. In this case both Divisions will be drawing combat supply from a supply dump. All supplies travel to a location via truck movement points. Drawing has a range of 5 hexes. In the picture below you can see that each unit is within 5 movement points of the supply dumps and so can supply the attack and the defense in combat.

How much does combat cost? See the yellow circles on the counters on the left side? Thats the step size of the units. The defender always pays 1 or 2 tokens for defense. The attacker pays 1 supply token per step attacking. So the Germans will pay 4 tokens and the defenders will pay 2 tokens (for being over 1 step in size). In OCS supply 1 SP equals 4 tokens. Think of it like 4 quarters equal a dollar in US currency. Therefore the German division will drain ALL the supply from the dump near Herentals. The Belgian defenders will use ALL the 2 tokens in Brussels. The next shot shows the supplies drained and tokens removed.


Now that we know the attack will happen (if attacker cannot draw supply attack is cancelled) we must calculate the combat wide die roll modifier. This modifier will be used in the surprise roll and the final roll to determine the result. This roll comes from comparing action ratings. Action ratings can be thought of as the overall combat ability of a unit. It is the small black number on the counter in the lower middle (between the white numbers which are attack and movement). The Germans have the higher AR so they will get a combat wide +1 die roll modifier.

Now we must roll for surprise. In OCS surprise can be the great combat equalizer. It can result in a total shock to the system and really throw your combat plans out of whack. You must roll 2d6 and consult the surprise table. The Germans add one to their roll and get a total of 9. Close but not enough as they needed 10 or more (see the pic below). Surprise can result in a 1D6 combat column shift so it is an immense modifier. Now we must have the defender pick the terrain types he wants to use in the fight.

The defender can pick a hex terrain type that the combat will be fought in. He cannot use a hexside for this choice. The Belgians have no choice but to pick "OPEN". Now the defender can pick the terrain type to modify the attackers strength. This CAN be a hexside so of course the defender picks minor river. This will cut the German attack strength in HALF!.


Once we have all the modifiers to terrain and such we figure our odds. The Germans had a 20 attack strength but that river cuts it to 10. The Belgians have a 10 defense so the odds are 1:1 on the OPEN combat line on the combat results table.


The German 86th Division has 4 steps and has fought hard to gain that river bank. They do not wish to retreat so they will take 1 step loss as the option. In one attack they have suffered two step losses and the 2 Step Loss marker is place below the unit to show this. The German division is mauled and will have to lick its wounds before pushing onward.

You can find more about it here:
http://www.multimanpublishing.com/Products/tabid/58/CategoryID/7/Default.aspx
The first thing we see in the image below are the two combat units involved in this attack. Picture if you will it is May 1940 and we have the 86th German Infantry Division attacking across a river trying to force back the 3rd Belgian Infantry Division (grey vs. green).

The first thing you must do is identify the attacker and the defender. There are certain rules for how many times a hex can be attacked and such and you should consult the 4.2 OCS rulebook for more information (Section 9 is combat).
The next thing you must do is put your combat units into supply. This can be thrown to you from an HQ or you can draw supply from a supply dump. In this case both Divisions will be drawing combat supply from a supply dump. All supplies travel to a location via truck movement points. Drawing has a range of 5 hexes. In the picture below you can see that each unit is within 5 movement points of the supply dumps and so can supply the attack and the defense in combat.

How much does combat cost? See the yellow circles on the counters on the left side? Thats the step size of the units. The defender always pays 1 or 2 tokens for defense. The attacker pays 1 supply token per step attacking. So the Germans will pay 4 tokens and the defenders will pay 2 tokens (for being over 1 step in size). In OCS supply 1 SP equals 4 tokens. Think of it like 4 quarters equal a dollar in US currency. Therefore the German division will drain ALL the supply from the dump near Herentals. The Belgian defenders will use ALL the 2 tokens in Brussels. The next shot shows the supplies drained and tokens removed.


Now that we know the attack will happen (if attacker cannot draw supply attack is cancelled) we must calculate the combat wide die roll modifier. This modifier will be used in the surprise roll and the final roll to determine the result. This roll comes from comparing action ratings. Action ratings can be thought of as the overall combat ability of a unit. It is the small black number on the counter in the lower middle (between the white numbers which are attack and movement). The Germans have the higher AR so they will get a combat wide +1 die roll modifier.

Now we must roll for surprise. In OCS surprise can be the great combat equalizer. It can result in a total shock to the system and really throw your combat plans out of whack. You must roll 2d6 and consult the surprise table. The Germans add one to their roll and get a total of 9. Close but not enough as they needed 10 or more (see the pic below). Surprise can result in a 1D6 combat column shift so it is an immense modifier. Now we must have the defender pick the terrain types he wants to use in the fight.

The defender can pick a hex terrain type that the combat will be fought in. He cannot use a hexside for this choice. The Belgians have no choice but to pick "OPEN". Now the defender can pick the terrain type to modify the attackers strength. This CAN be a hexside so of course the defender picks minor river. This will cut the German attack strength in HALF!.


Once we have all the modifiers to terrain and such we figure our odds. The Germans had a 20 attack strength but that river cuts it to 10. The Belgians have a 10 defense so the odds are 1:1 on the OPEN combat line on the combat results table.

The German player rolls and he gets a terrible roll of 3. He adds his +1 from the AR adjustments earlier and gets a total of 4. Still terrible. As you can see below that is a result of ATTACKER LOSES A STEP AND OPTION ATTACKER: retreat 1 or lose another step! The German attack fails miserably.

The German 86th Division has 4 steps and has fought hard to gain that river bank. They do not wish to retreat so they will take 1 step loss as the option. In one attack they have suffered two step losses and the 2 Step Loss marker is place below the unit to show this. The German division is mauled and will have to lick its wounds before pushing onward.

The attack segment will now to go on to any other attacks the phasing player wishes to make.
And there you have a very simple combat example in the OCS system. Of course this was a very easy setup and you won't always see this but it demonstrated the terrain and how to assign step losses.
Results of two Panzer Battle scenarios
Finished Pegasus Bridge and the opening tutorial for Panzer Battles Kursk last weekend.
the Pegasus Bridge is the third tutorial in the Panzer Battles Normandy game and the the scenario for Panzer Battles Kursk was Klyuchi.
I won each scenario and below are the final mapboard screenshots. In Pegaus Bridge you can see that the British Paratroopers captured each objective but were about to face some serious German Counter Attacks on the other side of the Orne (screenshot 1).
In the Kursk scenario I took the 50 point bunker even though I was facing overwhelming odds against that hex. Luckily it ended with me winning before the Soviets mounted counter attacks.
Look for more recaps in the coming weeks. Up next some sample OCS combat.


the Pegasus Bridge is the third tutorial in the Panzer Battles Normandy game and the the scenario for Panzer Battles Kursk was Klyuchi.
Pegasus Bridge, North of Caen: June 6th, 1944. (Scenario Size: Brigade. Allied Human vs Axis AI) In the early morning hours of the 6th of June, the paratroopers and glider men of the 6th British Airborne Division were landed on the far left end of the Normandy Beachhead. Their mission was to protect the flank of the British 3rd Infantry Division scheduled to land just west of the Orne Estuary. The action began with the glider coup-de-grace by Major John Howards D Company of the 2nd Battalion, Oxfordshire and Buckinghamshire Light Infantry. Their task was to secure the bridges across the Orne River and Canal and hold until relieved. Over the next 2 hours all of Brigadier Nigel Poett's 5th Parachute Brigade would land to build this easternmost bridgehead before the local German forces counterattacked.
Klyuchi, West of Prokhorovka: July 11th, 1943. (Scenario Size: Battalion. German Human vs Soviet AI) SS-Sturmbannführer Karl Ullrich's III Battalion, Regiment Totenkopf held the leftmost positions in the Psel bridgehead. With the river only 500 metres behind them, there was only one way - forward. Major Petr Grigorievich Moskovskiy's opposing 153rd Guards Rifle Regiment was weakened after a week of heavy fighting but continued to launch attacks against the tired SS panzer grenadiers. North West of Klyuchi an old army barracks had served as the focal point for these Soviet assaults. Totenkopf's commanders had decided to break out of the Psel bridgehead either today or tomorrow dependant on the Panzergruppe crossing the river. With this in mind, it was decided to clear the Russian Guardsmen out of the barracks as soon as possible and anchor the left flank of the Division here. You have been given a few hours to capture and clear the barracks - macht schnell!!
I won each scenario and below are the final mapboard screenshots. In Pegaus Bridge you can see that the British Paratroopers captured each objective but were about to face some serious German Counter Attacks on the other side of the Orne (screenshot 1).
In the Kursk scenario I took the 50 point bunker even though I was facing overwhelming odds against that hex. Luckily it ended with me winning before the Soviets mounted counter attacks.
Look for more recaps in the coming weeks. Up next some sample OCS combat.


Tuesday, July 5, 2016
John Tiller's Panzer Battles: Southern Kursk Front Tutorial Basics
The situation:
http://hudsonshideout.blogspot.com/2015/01/john-tillers-panzer-battles-kursk.html
I am finally getting around to playing it. John Tiller has since also released Panzer Battles Normandy which I also own. This post I am going to show the prep involved in the first German turn as the SS tries to take the barracks.
The first thing you want to do when you launch a scenario is take a look at your units and the surroundings. For this scenario I am going straight out of the book included in the install which is the Getting Started PDF. Typically this is found in the root directory of where you install the game.

The starting screen is typical Tiller flare where you can see how man smoke rounds you have and if air support is available. This game is a zoomed in sequel to Panzer Campaigns so you need to know that air is slightly delayed in this one and no where near automatic. You will see this later. You can click the above picture to enlarge it.
Before moving ANYONE near that bunker we are going to use our artillery assets. Along the top of the screen are several buttons and one looks like a radio. I push that to see what artillery we have. I dont want to use the last asset in the picture below because that is our smoke launcher for later. I call in strikes on the gun emplacements and listen to the thunder!


I was lucky and cause a few casualties on the Russian gun emplacements. Not a lot but this is random and your results may vary. Next up I plot my Stuka dive bomber assignment. Clicking on the small plane button next to the radio/artillery button up top shows I have one air strike, I plot it at a hex and on the map an airplane shows up on the target. The Stuka wont strike until next turn. Make sure your enemy doesn't move out of the hex!


Next up we will drop smoke. I click back on the artillery/radio button and choose the mortars, switching their fire type to smoke. I drop two of my six smoke rounds on the hexes below the 50 point victory hex. I plan to use these as cover.


After the smoke is dropped I move the SS Panzergrenadiers into action by creeping along the lower elevated gully and approach the barracks. They take some sporadic fire but not enough to shake their morale. The smoke will only last one more turn!
As you follow along in the book with me you can see that the results and what happens from here may vary. I will post larger battles later but wanted to show you how you perform a close and assault with your troops by pounding the enemy with air, artillery and then laying a smoke cover.
Klyuchi, West of Prokhorovka: July 11th, 1943. (Scenario Size: Battalion. German Human vs Soviet AI) SS-Sturmbannführer Karl Ullrich's III Battalion, Regiment Totenkopf held the leftmost positions in the Psel bridgehead. With the river only 500 metres behind them, there was only one way - forward. Major Petr Grigorievich Moskovskiy's opposing 153rd Guards Rifle Regiment was weakened after a week of heavy fighting but continued to launch attacks against the tired SS panzer grenadiers. North West of Klyuchi an old army barracks had served as the focal point for these Soviet assaults. Totenkopf's commanders had decided to break out of the Psel bridgehead either today or tomorrow dependant on the Panzergruppe crossing the river. With this in mind, it was decided to clear the Russian Guardsmen out of the barracks as soon as possible and anchor the left flank of the Division here. You have been given a few hours to capture and clear the barracks.This is the starter scenario for the first title in the John Tiller Panzer Battle series. I touched on this game briefly in a post a few years ago here:
http://hudsonshideout.blogspot.com/2015/01/john-tillers-panzer-battles-kursk.html
I am finally getting around to playing it. John Tiller has since also released Panzer Battles Normandy which I also own. This post I am going to show the prep involved in the first German turn as the SS tries to take the barracks.
The first thing you want to do when you launch a scenario is take a look at your units and the surroundings. For this scenario I am going straight out of the book included in the install which is the Getting Started PDF. Typically this is found in the root directory of where you install the game.

The starting screen is typical Tiller flare where you can see how man smoke rounds you have and if air support is available. This game is a zoomed in sequel to Panzer Campaigns so you need to know that air is slightly delayed in this one and no where near automatic. You will see this later. You can click the above picture to enlarge it.
Before moving ANYONE near that bunker we are going to use our artillery assets. Along the top of the screen are several buttons and one looks like a radio. I push that to see what artillery we have. I dont want to use the last asset in the picture below because that is our smoke launcher for later. I call in strikes on the gun emplacements and listen to the thunder!

I was lucky and cause a few casualties on the Russian gun emplacements. Not a lot but this is random and your results may vary. Next up I plot my Stuka dive bomber assignment. Clicking on the small plane button next to the radio/artillery button up top shows I have one air strike, I plot it at a hex and on the map an airplane shows up on the target. The Stuka wont strike until next turn. Make sure your enemy doesn't move out of the hex!

Next up we will drop smoke. I click back on the artillery/radio button and choose the mortars, switching their fire type to smoke. I drop two of my six smoke rounds on the hexes below the 50 point victory hex. I plan to use these as cover.


After the smoke is dropped I move the SS Panzergrenadiers into action by creeping along the lower elevated gully and approach the barracks. They take some sporadic fire but not enough to shake their morale. The smoke will only last one more turn!
As you follow along in the book with me you can see that the results and what happens from here may vary. I will post larger battles later but wanted to show you how you perform a close and assault with your troops by pounding the enemy with air, artillery and then laying a smoke cover.
MMP's Blitzkrieg Legend and the fast end of the starter scenario
OOPS! Watch me beat myself in OCS Blitzkrieg Legend in 17 minutes!
OCS system reserve mode tip
OCS nasty trick for players: move a Reserve unit 25% of its MA. Seem unfair?
It's not....read the yellow box in the image below.
Before putting a unit in reserve mode you can choose travel or combat mode before placing the reserve status marker.
If it's in travel mode suddenly 25% is quite a bit. Suddenly that mechanized unit in travel mode can take a 3 hex move even though it's in reserve. Another subtle yet brilliant feature of the game as this represents combat reserves being shuffled behind the lines.

If it's in travel mode suddenly 25% is quite a bit. Suddenly that mechanized unit in travel mode can take a 3 hex move even though it's in reserve. Another subtle yet brilliant feature of the game as this represents combat reserves being shuffled behind the lines.
Monday, July 4, 2016
Sunday, July 3, 2016
Reluctant Enemies OCS Turn 1 face to face
Over the Fourth of July weekend I got my first real taste of a turn in the OCS system in with some face to face play. We had practiced initially late one Friday night till 1am and completed half a turn. This time we wanted to get June 8th 1941 in the books and finish a whole turn. Reluctant Enemies is the game by MMP that uses the Operational Combat System to cover the Operation Exporter campaign.
On turn one my commandos landed on the coast but they were scattered and I lost a unit. Then the initial attacks I made can be seen in the first picture below. I managed to strike upwards toward Beirut and Damascus and destroy several Vichy French units. While my air power was ineffective my artillery barrages fared a bit better.
The Vichy French player blew a supply dump evacuating one town then on his turn cornered and eliminated my poorly used Commandos. He also heavily bombed the Commonwealth units driving up the middle after they had great initial success.
We hope to finish the game via Vassal so after turn one and before the initiative for Turn 2 we saved the locations via the Vassal engine.


Subscribe to:
Posts (Atom)